

Learn the quick and easy trick to inverting complex mask groups in any version of Lightroom or Adobe Camera Raw
Prefer to watch instead of read? Check out the video version of this tutorial HERE:
There's no doubt about it, the new Lightroom Masking tools that were recently introduced are a significant improvement over what you could do before with local adjustments. One sizeable gap - for now, at least - is the lack of a simple option to invert an entire mask group. Currently, individual masks can be inverted with the click of a button but not a mask group that contains, say, a Subject mask combined with added, subtracted, or intersected masks.
There's often a need to tweak AI-generated Smart Selection masks in Lightroom by creating complex combinations, either due to your own creative decisions or because one of the new AI masks for subjects and skies didn't quite select things correctly.
Fortunately, not all is lost! Here are the quick and easy steps for how to invert a mask group in Lightroom. This works for Lightroom, Lightroom Classic, Lightroom Mobile, and Adobe Camera Raw.
Table of Contents
Not sure of the differences between Lightroom and Lightroom Classic? Check out my deep-dive comparison to help you understand the pros and cons of each to help you choose the right version to meet your personal needs!
Understanding Lightroom Mask Groups
Let's start with a quick overview of what mask groups are, and how they're structured. In the following example, I've created a mask for the subject of the photo, who is holding a pumpkin. If you've read or watched my deep-dive tutorial for Lightroom Masking, you've seen this image before.

The Smart Selection mask included a small part of the background where there's little contrast between the subject's jacket and its surroundings. I've corrected for this with the Refine Jacket mask. For the sake of this example, I also wanted to exclude the pumpkin, which is accounted for in the cleverly named Exclude Pumpkin mask.
Those three masks - Subject 1, Refine Jacket, and Exclude Pumpkin - make up the mask group. A mask group behaves as a single mask, but it is made up of one or more individual masks. You may also see mask groups referred to as complex masks, or mask combinations.
One important thing to remember for this particular tutorial: The mask on the bottom of a mask group is the primary mask within the group. You'll see in a moment why that's important.
How to Invert a Lightroom Mask Group
So now I have a mask selection (the mask group) for the person in this photo (the subject). It currently excludes both the background and the pumpkin. But what if I want to adjust those two areas of the image without impacting the person?
If I just had a single mask for the subject, I would simply invert that single mask and start with my adjustments but, in this case, I had to use three masks to create the final subject mask. I can't just invert all three of them or I'll end up with nothing selected for the mask:


Left: The original mask group used to select the subject (shaded red) Right: After inverting every mask in the group, there is nothing masked
Instead of inverting every single mask within the group, you need to do the following:
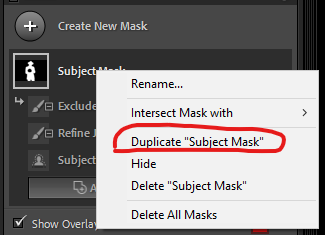
STEP 1 - Duplicate the mask group you want to invert by right-clicking on the group (in this example, Subject Mask, as circled in first image) and then selecting Duplicate [Mask Name]:

STEP 2 - Rename the newly duplicated mask group to help keep things organized:

STEP 3 - Right-click on the primary mask in your duplicate mask group (here, Subject Mask Inverted); remember, the primary mask in a group is the mask on the bottom of the group. In this example, that's the Subject 1 mask. Then select Invert:

At this point, the primary mask has been inverted but now the Refine Jacket and Exclude Pumpkin masks (both circled in the second image below) are not yet accounted for in the updated mask group selection:


Left: The original mask group selection
Right: The updated mask group with the primary mask inverted
Quick Note - On Lightroom mobile, the invert option is not listed in the contextual menu (accessed via the three vertical dots to the right of each mask when the masking panel is open). Instead, you must tap on the invert icon, called out by the red arrow in the following screenshot:

STEP 4 - Right-click on the remaining masks within the mask group (in this example, Refine Jacket and Exclude Pumpkin) and select Convert to Add:

IMPORTANT NOTE: Since both of the secondary masks in this example were originally subtracted from the primary mask, we see Convert to Add in the right-click menu. If a secondary mask had been added to the primary mask instead, we would see Convert to Subtract. The Convert To option will always be the opposite of how the mask was created.
Once you have finished using the Convert To option to "flip" all secondary masks within the group, you're done! In this example, we've changed the original group mask from this:

To this:

In Summary
Be sure to watch the video for this tutorial, as well, so you can watch me walk through the above example. I also provide an example in the video of how this works when you have intersected masks in a mask group (and I hop over to Lightroom "Desktop" so you can see what it looks like in that version).
Otherwise, to invert an entire mask group, you'll:
Duplicate the group you want to invert
Rename the duplicated group to keep yourself organized
Invert the primary mask within the new group
Convert the secondary masks in the group using Convert To
I hope you found this helpful! If so, please leave a comment and tap the heart icon to let me know.

Support My Work
I've been pursuing my passion for photography, while producing educational resources and other content, for several years now. It has required plenty of time, patience, and monetary investment. Without my supporters, none of it would be possible. Every contribution, no matter the amount, allows me to continue creating new work while sharing my love for the natural world.
Become a member of my Patreon to earn exclusive perks, such as ad-free videos, early access to my ebooks, exclusive discounts, and even free prints and limited-edition folios.

You may also make a one-time donation via PayPal. However you choose to contribute, it will be greatly appreciated.
Join the Community
Sign up for a free site membership to leave comments under your own name and receive notifications when I or others reply to your comments (or like them). You'll also receive a special welcome offer towards your next order of my open-edition fine art prints.


Comments